Through the Mirror
- Jun 6, 2023
- 5 min read
Updated: Dec 15, 2024
The idea for this scene came from an old project that I abandoned after the scope became to large for me to accomplish.
I had a hallway scene which two characters would meet in, a mirror separating them. I repurposed the scene so I could explore a more detailed nature scene on a smaller scale.

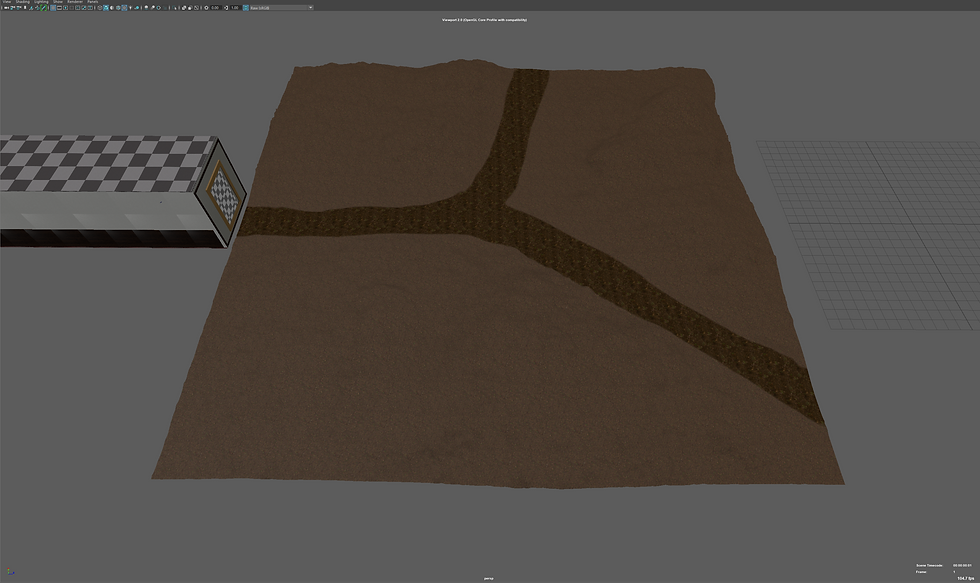
The first thing I did was create a floor for the nature portion of the scene using sculpting and stamps to build up the land. Then I took a flattening brush and created the forking path.
In Maya there was a tool I have wanted to explore for a while called 3D Paint which allows me to draw directly onto the mesh. I thought about using it to paint grass and dirt textures onto the mesh but to my knowledge that is not possible in native Maya, so I decided to use it for creating a mask of white and black for the imported ground textures and later Mash object distribution. This worked fantastically and will become my primary way to paint textures and Mash distribution maps for its ease of use and easy updating for changes down the road.
For the trees I went back into Blender and created a new tree with the intention of experimenting with the animation option in the tree creation tool. I designed the tree and gave is a slight breeze moving the branches slightly and exported it as an FXB. A problem with the export was that it exported the thousands of bone armatures along with the model which would dictate its animation. I tried importing it but after 15 minutes of waiting I closed Maya and decided to return to an Alembic export which can be extremely resource heavy, exporting a full model of each frame rather than its locations and changes. The Alembic export was several gigabytes as I exported 400 frames of its animation, ~16 seconds long.

With how small the scene was / how much of the scene could be seen through the mirror I wanted to try and use another Mash technique called the Placer. This allows me to place the trees in precise locations and later move them around. I had problems with this tool before as several objects would not allow placements on certain parts of them. This, I realised, was due to me altering the UV maps of the object so textures would appear smaller on them or to line the texture up better with the object. Understanding this allowed me to use the Placer with no problem and adding another great tool for later use in projects and this one.
I didn't want to have hundreds of trees filling up the background so that you can't see the horizon, nor did I want to add to much depth to the image as its design created two boundaries, camera to mirror and mirror to trees, and wanted to keep it contained to the two boundaries. I used a potted plant model, I had purchased for another project, and deleted the pot which left me with a small bush which worked well on its own. I tried using the Map based distribution, but it never had the look I wanted so I used the placer again which worked perfectly.

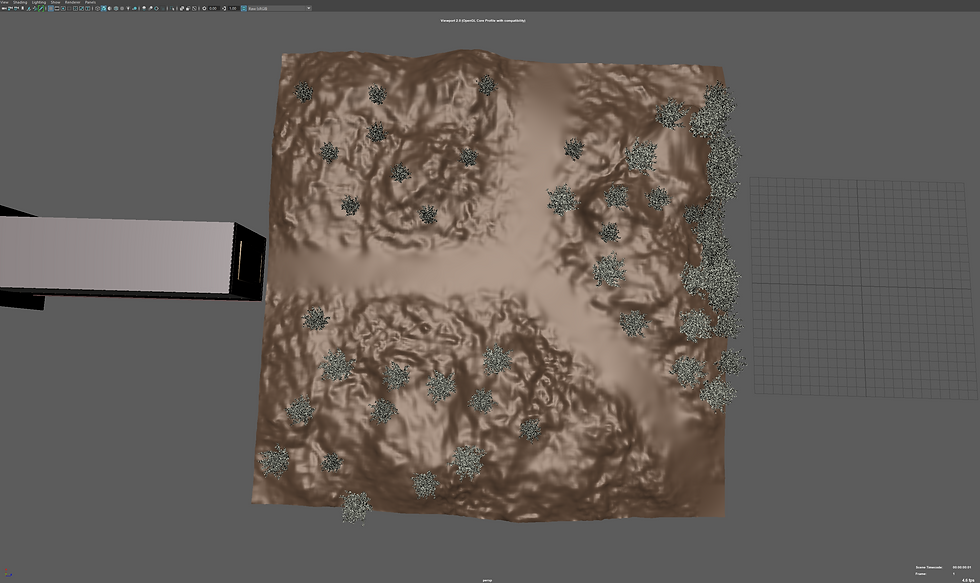
I tried adding grass, ferns, nettles, and dandelions across the mesh using the Map distribution but no matter the different settings I used it was always missing something or looked too empty. Separating the grass from the others allowed a nice coverage while still keeping a good amount of ferns, nettles and dandelions to keep a chaotic look. However, being a computer, random is made using opposing values that often overlap creating a pattern rather than a random look.

Both images use random distribution, yet patterns are clearly visible in the images. The top one being obvious, the bottom being less so but still there. These where not changed using a different seed number, but the amount of object distributed along the surface. Often these patterns aren't visible unless overhead or the distribution is condensed enough but knowing it’s there annoys me so I had to do something about it.

Combining the different Mash networks created a really good image that I'm really happy with. Again, patterns are noticeable but with enough chaos it covers up the patterns. The image at this point looked good, even though the path looks bland the texture made it look walked on and convincing. But I still wanted to complicate the image more so I took a model of the grass I imported and deleted a lot of bottoms of it leaving a very sparce grass patch that would work well on the path as grass couldn't grow due to people walking up and down it, however, often you do find these small patches of grass that manage to survive. The edge of the path also has more sparce patches which would better sell the look.

On https://polyhaven.com/models (Free repository of textures & models) I found a bundle of three dead branches which once shrunk down would make really convincing sticks that would litter the path further selling the scene.

While rendering the scene I decided I wanted to add a signpost pointing down both paths to better signify them. Mist was also a must have for me, adding moisture to the air. Using the same fog as in the mountain range I imported it twice, once for the back of the scene and had the fog be thick, then a second time and less thick adding greatly to the scene. I also added clouds to liven up the plain blue sky and after adding a clear HDRI image it created some great shadows and light piercing through the trees and lighting up the mist.
I ended up going back and changing some textures and improving others. For example, using brighter wood in the hallway, better wallpaper texture and adding imperfections in the corners of objects and along the walls. I also added some dust to the 'mirror' to make it stand out more that it's not just an open hole to the other side but rather a reflective surface that you need to look through.
Rendering the image at 500 samples per frame took around 7-9 minutes. To use the full 400 frames the trees are animated with would take 46+ hours to render, leaving my computer almost unusable for anything other than light use, and using 300-500watts continuously for 46+ hours costing probably another arm or leg. So, I abandoned the animation and stuck to a high-resolution render, 2k at 600 samples with denoise which took 16 minutes to render.
